If you are surviving the record heat in Arizona , chances are you are doing it with an ice-cold beverage in your hand. Save yourself the trips to Circle K or Starbucks and install an ice maker water line in your home. Because when the Arizona sun blazes, who wouldn't want cold water and ice at the ready?
Curious about your options? Stick around as we unveil the steps and choices ahead.
Options for Homeowners
How to Install an Ice Maker Water Line: Steps for DIY
Why Consider Hiring a Professional Plumber?
When thinking about how to install an ice maker water line, homeowners face two main options. The first is the do-it-yourself (DIY) approach, and the second is hiring a professional plumber.
The DIY approach might appeal to those who enjoy hands-on projects. Homeowners can take pride in managing the installation, and it can be cost-effective if they already have the necessary tools.
To go this route, you would connect the water line directly to your fridge water line. This requires some understanding of your home's plumbing system and a degree of technical skill. It's essential to be aware of the water source, the right connections, and the precautions to take.
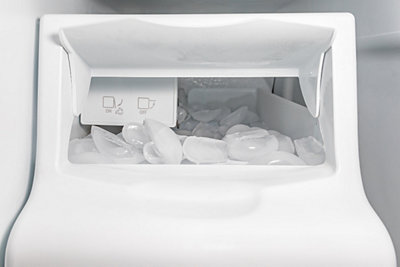
The ice maker or water dispenser in your refrigerator can give you cold water and ice cubes whenever you desire. But, for it to work efficiently, the water line connection needs to be secure and leak-free.
On the other hand, hiring a professional plumber comes with a strong set of advantages. They bring years of experience and can ensure the water line installation is done right the first time. For homeowners not comfortable with DIY or those lacking the time, a professional can be the go-to option.
Additionally, a pro can spot potential issues that might not be evident to an untrained eye. Plus, there's the added benefit of not having to source and buy materials. Everything is taken care of, from the start of the process until the end.
There's something truly rewarding about taking on home projects yourself. Setting up an ice maker water line might seem daunting, but with a little guidance and the right tools, you can achieve this task.
Before you embark on the installation journey, it's crucial to have all your tools and materials ready. This can save you the hassle of running to the store midway through. The essentials you'll need include:
Pipe cutters
Copper tubing for the water supply line
Tee fitting
Supply tubing
Depending on your refrigerator's brand and model, you might also need some brand-specific parts. It's a good idea to refer to your refrigerator's manual or even seek advice from the store where you purchased it. They can provide tips on what materials work best with your ice maker or water dispenser.
The heart of this installation is your home's water source. This is where you'll draw the cold water from for those refreshing glasses of water and ice cubes. In most homes, the water source is located beneath the kitchen sink or in the basement.
Once you've found the source, identify the cold-water pipe. It's vital to connect the ice maker water line to the cold water, as this ensures you get chilled water and perfectly formed batches of ice.
Safety first! Before making any connections, you need to turn off the water. This step is crucial as it prevents any water mishaps, like unwanted sprays or leaks.
Locate the water valve that's closest to the pipe you're working on. It's usually a round or oval-shaped knob. Gently turn the knob clockwise until it's tight.
This action cuts off the water supply. After turning off the water, it's a good practice to open the kitchen faucet to release any trapped water or pressure. This ensures a safe and dry environment for you to work in.
Once you've securely turned off your water and prepped your workspace, you're ready to move on to one of the main tasks: connecting the supply tubing to the refrigerator water line. The process to install a water line might differ slightly based on the refrigerator's model, so always keep the user manual nearby as a reference.
First, locate the water inlet on your fridge. This is where you'll be attaching the supply tubing. Feed one end of the copper tubing into this inlet. Make sure you push the tubing until it fits snugly and securely.
Next, you'll need to connect the other end to your home's water supply pipe. This can be achieved using the tee fitting. This fitting allows you to tap into the existing water supply without rerouting or cutting through major plumbing.
After making the connections, the next vital step is to check for leaks. A small leak can lead to gallons of water being wasted over time, not to mention potential damage to your floors and cabinets. To make sure everything is sealed tight, follow this straightforward method:
With your connections in place, gently turn on the water supply. Do this slowly to avoid a sudden rush of water that could dislodge your new connections.
Once the water is running, observe all the connection points. Look for any dripping or pooling water. It's essential to be thorough here, as even the smallest leak can be problematic down the line.
If you spot any leaks, turn off the water supply immediately. Tighten your connections, replace any faulty components, and run the check again. Sometimes, you might need to apply a bit more force or adjust the position of the copper tubing to achieve a perfect seal.
You've come a long way and you're nearly done. Now, it's time to see your hard work in action. Head over to your refrigerator and activate the ice maker or water dispenser.
It's okay if the water appears a little cloudy at first; this is just air bubbles from the new water line settling. Pour a few glasses until the water runs clear. Then, wait and observe.
Over the next few hours, the ice maker should produce its first batches of ice. Make sure the ice cubes are of the right size and shape. If you notice any odd tastes or odors in the water, it might be beneficial to flush a few more gallons of water through the system to clear out any residue.
So, you're thinking of installing or repairing some plumbing in your home? The DIY route can be tempting. After all, the web is packed with how-to videos and articles.
But there's more to plumbing than just following steps. This is where professionals step in. Hiring a professional plumber can offer you advantages that aren't immediately obvious.
Imagine wanting to set up a tee stop valve. Now, imagine doing that without any prior experience. Tricky, right? Plumbing might look straightforward, but it's a field where expertise and hands-on experience matter.
A professional plumber has trained for years to master their craft. They have seen all types of setups, tackled a range of problems, and worked with various models of appliances and systems. So, when they face a plumbing challenge, they pull from a deep reservoir of knowledge.
This means they can identify and solve problems faster and more accurately than someone new to the craft. Also, their experience allows them to give advice. Maybe there's a more efficient way to set up your plumbing, or perhaps a particular model of appliance would serve you better.
A professional plumber can guide you based on what they've seen work (or not work) in countless other homes.
For many homeowners, the appeal of tackling home projects on their own can be tempting. The idea of saving money and the satisfaction of self-accomplishment can drive one to take the DIY route.
However, when it comes to plumbing, the landscape is riddled with potential pitfalls. Even with countless online tutorials and step-by-step guides, there's a vast difference between reading about a task and executing it correctly. Plumbing systems are intricate, and one misstep can lead to consequences that aren't immediately apparent.
For instance, overtightening a connection may seem like a good idea to ensure no leaks, but it can result in stripped screws or broken seals. This can lead to slow leaks inside walls that may go unnoticed until significant damage occurs.
On the flip side, connections that are too loose can lead to sudden and evident water damage. Furthermore, there are considerations like ensuring the right slope for drainage or understanding venting requirements, which are easy to overlook for the untrained individual.
Materials present another challenge. Mixing metals, like copper and steel, without the appropriate connector can result in corrosion. Using the wrong type of sealant can lead to leaks or contamination of drinking water. These errors aren't just about immediate function; they can have long-term implications on the integrity of the entire plumbing system.
Then there's the issue of understanding local building codes. Professionals are up to date on these regulations and ensure not only the functionality but also the legality of the work done.
While DIY projects are done with the best intentions, they often lack the finesse and knowledge that come with years of professional experience. The risk of falling into these common pitfalls makes a strong case for considering professional intervention, especially when the stakes are high.
Plumbing tasks can be time-consuming, especially if you're unfamiliar with the process. Think about the time it takes to watch tutorials, gather tools, and then actually do the work.
And if something goes wrong? You're back to square one.
A professional plumber, on the other hand, comes prepared. They assess, act, and finish tasks with efficiency. Instead of spending hours or even days trying to set up a tee stop valve, a professional could complete it in a fraction of the time.
The real test of a plumbing job isn't just when it's completed but, in the days, weeks, and months that follow. DIY jobs can seem fine at first but might show issues later. Leaks, blockages, or even damage can emerge.
When you hire a professional, you're not just paying for the task at hand. You're investing in peace of mind. Plumbers stand by their work. If there are issues, they'll fix them.
And they ensure that everything they do meets the highest safety standards. So, you can rest easy knowing your home won't face unexpected plumbing disasters.
Every plumbing task requires tools and materials. Some, like wrenches or pliers, might be in your garage. But specialized tasks need specialized tools.
If you're thinking of installing something specific, like a tee stop valve, do you have the right tools? And what about the parts? The washers, the seals, the specific pipe lengths?
A trip to the hardware store might solve that, but what if you buy the wrong thing? With a professional plumber, these worries vanish. They arrive in a van or truck packed with tools and parts for every kind of job.
No guessing, no returns to the store, and no leftover parts you have no use for. The pro handles it all, from start to finish.
Arizona homeowners have choices when it comes to how to install an ice maker water line. Both the DIY route and professional services come with their perks. Yet, if peace of mind, assured quality, and time-savings are what you desire, perhaps the decision isn't that complicated after all.
After all, our team at Parker & Sons has been delivering top-notch services in Phoenix since 1974. Interested in experiencing exceptional service that's backed by a legacy? Schedule your appointment today and let us handle the details for you.
Stay up-to-date on current news, promotions, and industry tips.